Tuesday, 14 January 2014

Portrait week 15

Life drawing portraiture face, the aim of today's lesson was to draw out the model's face. We are working towards preparing ourselves for creating concept artwork, this drawing will be of the model's face and shoulders; muscles and bone structures.
First attempt practise drawing
To begin the drawing I drew out the form using simple shapes, a circle for the skull.

End of the day photo
The technique of drawing out the forms before doing any detail works really well as it allows me to get the drawing accurate and lifelike. I am pleased with the result in this drawing as it is my most favourite drawing this year to date.

The head is created from the skull; cranium, face, neck and jaw. These parts are drawn in using spheres and shapes. Drawing in the foundations first makes the work much easier in the long run. We were given diagrams of the forms for human anatomy, it showed simple shapes to use which really helped with drawing this piece. The muscle diagrams helped too.

Friday, 10 January 2014

The Perspective in Concept Art

Video games that are represented in 3 dimensional graphics allow us to experience realism in the virtual world; perspective allows us to mimic the real world by adding depth to the rendering. 
2 point perspective 
The image above is an example I made in Photoshop; the object would be more realistic if the vanishing points were spread further away off the image. 
2 point perspective 


3 point perspective 
In a perspective drawing, an object gets smaller the further away it is from the viewer. 

If an object overlaps over another object, it will appear closer to the viewer. 

Colours are less saturated the further they are away; the more air the light travels through the more the colour is affected. 
Distance - Saturation 

1 point perspective 

The 1 point perspective was used by Leonardo Da Vinci in his Last Supper painting. 

The Composition of Concept Art

When concept art is created; lots of planning and thought goes into the process. Concept art is created using a set of rules to allow for a pleasing appearance/layout. 

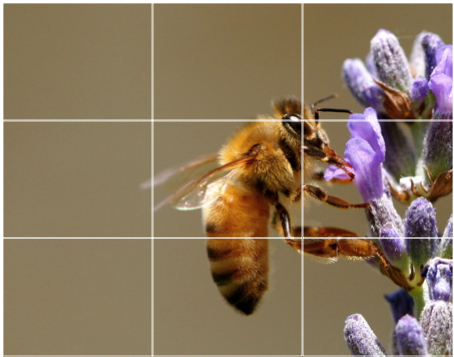
One important thing is to start with is the horizon line; the artist must decide where the horizon will be so that they can see the perspective. The horizon line fits best sitting on one of the rule of thirds. 

The rule of thirds is where the image is divided into a grid of 3 by 3; the main focus point of the image should intersect where the horizontal and vertical lines meet. Other parts of the image can be less to scale, contrast or colour; leading eyes back to the main focus point. 


Using the the golden ratio 1:1.618 allows for the viewer to focus on the main area of the image. 


The diagonal rule can show movement, such as a beach shore line or a river. 

An S-line is for example, a curved road in the shape of the letter S; it shows flow or movement within a scene. 

The triangle rule is where three objects are positioned in a triangle; our eyes naturally move between objects. Most humans are used to reading from left to right. 

The frame rule is where an object reveals another focus point through a hole such as looking through a keyhole or a window; the object we are looking through is like a frame. 

Avoid Clutter; any unnecessary elements in the image will distract the viewers from the main focus points of the image; distractions or clutter may appear in the foreground or background of the image. Light objects against dark objects, flares, telephone poles, wires, etc can create clutter in the composition. 

Undesirable Mergers; avoid positioning a tree directly behind a character, if a tree appears to be growing out of the character it can make the image less effective. 

Thursday, 12 December 2013

Women In Games

The gaming industry has over the last thirty years gone from being a garage based industry, where the game developers worked in their homes to multi-national and in some companies even global enterprises. Home based indie game developers have become more commonplace once again in recent years as the costs of running game studios increases while the game development process becomes easier with the use of game engines. Over these years, the role of females has changed in the industry (as consumers, developers and as game developers). In this essay I am attempting to evaluate the importance of females in games over the last three decades. 

Tuesday, 10 December 2013

Multi-view Observation & Clay Modelling - week 12

Today we had to make quick observational sketches of the model at different view points, we rotated around the room until we had drawn each view point. 


After that we were given 2 blocks of clay with which to sculpt a 3D model out of; the rest of the day was used to model the bust figure. The task was to sculpt it while using the live model for reference. 


I found the modelling to be difficult as I had not done any before, moving around the room while trying to get the right shape in the clay was not the easiest thing for me. It worked okay for getting the basic shape of things but it was not easy to get the muscles in. 

Friday, 29 November 2013

Dumpster Development

I have been given the task of creating a 3d dumpster model for a 3rd person action adventure game set in the grimy streets of a modern metropolis. The technical specifications required me to work in Centimetres so I went into 3ds Max set the Unit Scale to Metric 'Centimeters'. The model had to be within 650 triangles and the texture was to be 1024x1024. 

To proceed with this task I first went outside to find a dumpster to use as my reference. I took some photographs using my smartphone and jotted down some approximate measurements. 


Reference Photographs 


Modelling the Dumpster 


My first step was to create a box with the correct measurements in as the width height and depth. 

Used the Bevel tool to hollow out the box. 

 I used the connect edges to divide the lid into sections to allow me to reshape the top side. 


I created the wheels by making a Cyclinder and a Box, I used the Bevel tool to shape the box into a wheel connector. I was able to delete the hidden polygons on the Cylinder that were covered up to save on the polygon count.  


After the wheel was created I was able to move the pivot to the top of the wheel and then position it at the same height as the base of the bin by copying the Z co-ordinates over. 
Cloned the wheels to make additional wheels. 

I created the handles on the sides out of a box and using the Bevel tool. 
 Then I used the Mirror tool. 


Once the handle was positioned correctly, I set the pivot to 0,0,0 and mirrored it to create the opposite handle.  


Texturing and Texture Creation 


UVW Unwrapping. 

I rendered the texture for use in Photoshop later to allow me to create the texture. 

Next I wanted to create an Ambient Occlusion map to add shadows to the texture. I searched for how to bake ambient occlusion on Google to remind myself how it was done. 


I set the Renderer to use Mental Ray and under the Output I set it to create Ambient Occlusions with 1024x1024 dimensions. 


I had to combine the two textures into one using Photoshop, then saved them in the Texture file keeping them on a separate layer and setting it to Multiply. 
 I copied parts of the reference photos into Photoshop and edited them to fit the textures. 


Copying the texture into another document, I was able to create a specular map by desaturating the image and then changing the lightness of different parts. 


I created a bump map bitmap image by copying the texture and desaturating it, adjusting the brightness for where the bumps need to occur. 


Go Bananas Dumpster (click to view in 3D)Go Bananas Dumpster


Evaluation 

I think the strengths of my Dumpster model are: that the model looks realistic in shape and it's texturing. The dimensions are approximate to the real thing and it is within the polygon limits set by the brief. 

The weaknesses for the model: the textures on the wheels aren't perfectly round, I could have made them more realistic by taking more reference photographs of the wheels. The bump map could have been better if I spent a bit more time on it. 

Tuesday, 19 November 2013

Volumetric Drawing - week 9

Today we did volumetric life drawing, the aim was to draw the female model. Capturing fast poses, tones and colour.
I didn't finish the face but you get the idea
I think that the drawing went well, the technique allowed me to capture the forms of the female body.